


There are many of you who hear the words Gocco and know exactly what I'm talking about, but for those of you who may say--Huh? This post is for you. I received a request to share how the Gocco works and I'm always happy to gocco so why not chronicle the process while making some holiday cards. If you want history about the gocco, visit here If you're like me looking on a daily basis for places to find supplies... visit here for a list of resources. Need Gocco Inspiration or just want to see how others use their gocco, visit Flickr and type in Gocco and you'll be amazed at what you find.
For all of you gocco experts if you do something different please share but this is my process and as a novice in the world of gocco... its pretty basic, but I would be lying if I didn't say there is a gocco learning curve. In all honesty, it's better to just get one and start using it and allow for mistakes and mishaps because it will only make you better in the long run. Instead of one long post I've broken it up. Let's Gocco!
Friday, November 30, 2007
Gocco Anyone? Pt. 1

Let's Gocco Pt.2
I have the B5 gocco, its larger than the one many people have. My screens are larger and it requires more bulbs etc. So I'll talk about my process with this model of the Gocco {although the process isn't too different}
First Supplies...
Gocco
Blue Filter
Original Overlay Paper
B5 Screen
4-Bulbs
Inks
Ink Blocking tape
Laser print out or copy of your design
** You need the laser print out because the carbon in the ink is what creates your design on the screen when the bulbs flash and basically take a picture of your image. Then its the image on the screen that will allow for ink to come through to make your design.
Step One: Setting Everything Up.
A. Place the Original Overlay Paper on to the sticky padding (this is needed only when you are making your original document) *since the pad is sticky this will ensure your image with adhere to the screen and not stay stuck to the padding.
B. Grab your screen and filter and place the filter on the site of the screen that is is clear with the blue side of the screen (and you will see an arrow in the left corner) facing you.
C. Slide the filter and screen into the slot making sure it is secure and in the right position.
D. Place your image on top of the Original Overlay Paper.
E. Check your image by closing the gocco to make sure your image is centered and how you want it positioned for prining. Once you are satisified with the position of the image close your gocco.

Let's Gocco Pt. 3
Step Two : Taking the Picture
A. Take the bulbs and screw them into the slots (4 if you're using a B5; 2 if your using the B6).
B. You will need to insert the bulbs into the opening on the top of your Gocco and make sure that the arrow is pointing in the right direction (honestly it won't work if you don't do it any other way)
C. Once the bulb holder is in place Grab the handles of the gocco and with some a little force press down on the gocco. What will happen is a flash will occur (taking the picture of the image)
D. Once you have done this DO NOT OPEN YOUR GOCCO--- I REPEAT! DO NOT OPEN YOUR GOCCO. Pull out the light bulb holder and set it aside. Allow for the bulbs to cool before discarding (I usually move it out of the room I gocco in cause I don't enjoy that smoky smell.)
E. After removing the bulb holder, now open the gocco and your image should be attached to the screen.
F. Remove the Original Overlay paper from the sticky pad and set aside.
G. Pull out the screen set the filter aside and lay the screen flat so the clear side and screen covering are facing you.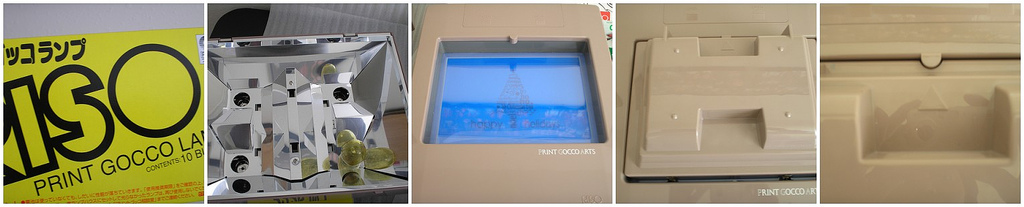

Step Three: Lets Color
A.Open up the clear screen covering to show your image. Many images require more than one color so to make sure those colors don't mix you need the ink blocking tape. Place the ink blocking tape around the image areas that require specific colors, note my picture.
If youre image only requires one color I still suggest using the ink blocking tape around your image to control the amount of ink used and where it goes.
B. Once you've put ink blocking tape around your image, lets color. Using the inks, color your images the desired colors.
C. Once all the images have been colored close the screen covering and get ready to print.

Thursday, November 29, 2007
Let's Gocco Pt. 4
Step Four: Lets Print
A. Pick up your inked screen and make sure the blue side and arrow are facing you.
B. You will now need to remove your laser print out. (I usually hold the screen in one hand and GENTLY pull the laser print out away from the screen.) If you do this too quick you may leave paper on your image that will get stuck to the screen or injur the screen.
C. Once the laser print out is removed, set it aside and then with the blue side of the screen still facing you, slide the image into the gocco.
D. Select your card and place it on the sticky pad (the pad will keep your paper secure through the process)
*Note if your sticky pad is no longer sticky... the book says to use a damp cloth and pat on the pad then pad tape onto the pad and that is suppose to make your pad sticky again--I haven't tried this yet if any one has let me know if it works)
E. Use the glass window to determine if your card is positioned where you want it to be. If you want to mark your cards place use these red tabs (pictured) to mark the card positioning.
F. Once the card is in place you're ready to print. Close the gocco with a firm press and GENTLY pull it back open and you will see a gocco'd card. Joy and elation should follow {it always does for me} Find a place to set your cards so they can dry. And repeat process until you've printed everything you would like to print. 
The Gocco will print in large quantities sometimes without re-inking and sometimes you may have to re-ink. If you have to re-ink its simple.
A. Pull out the screen
B. Lay a blank piece of paper down on your gocco area (if you don't you will have ink on your table or workspace)
C. Open up the screen and based on where you see ink is needed put a dab of ink on that spot.
D. Close the screen covering and insert back into the gocco and resume printing.
This is how it's done. If you have questions, want to share tips and tricks or just want to comment--feel free. I hope this has been informative.
Monday, November 19, 2007
On Holiday...
that was my gocco this weekend--on holiday. I love my gocco and think everyone should get one, but this weekend, my gocco was testing my affections and causing me grief as I was printing these flat notes for the holiday. Luckily, we became friends again and these turned out ok.

The Handmade Holiday Continues...
Thursday, November 8, 2007
And So It Begins...

My crafting bonanza begins now. I've mapped out my plan, and hope I didn't get to ambitious, but either way I'm ready. I will open up the etsy store too, so as I post things and you see something you like, visit the store and get one for yourself... and your best friend too :)
{The image is of greeting cards I made with my gocco (I really love my gocco!)}
Saturday, August 11, 2007
Gocco Project #1
Today I tested out the B6 gocco and well... it turned out pretty good. Now I see why everyone is so in love with the gocco and now I'm in love too. I created a simple birthday invite. Here's a sample of what I did.